This manual, prepared by Jeep specialists, details the 2015 Patriot’s operation and maintenance. It’s a vital resource for all owners, offering 572 pages of information.
Owners can access a free PDF version (3 MB) online or request a printed copy via phone. Understanding this guide ensures safe and enjoyable vehicle ownership.
Purpose of the Manual
The primary goal of this 2015 Jeep Patriot Owner’s Manual is to fully familiarize you with your vehicle’s features, operation, and maintenance procedures. It serves as a comprehensive guide, developed with input from Jeep’s service and engineering teams, to ensure a safe and satisfying ownership experience.
This document details everything from understanding dashboard symbols to performing routine checks and addressing potential issues. It’s designed to help you maximize your vehicle’s performance and longevity. Furthermore, it supplements important documentation like the Warranty Information booklet, providing a complete resource for all your Jeep Patriot needs. Accessing a complimentary printed copy is possible for first-time retail owners through a dedicated customer service line.
Vehicle Identification
Proper vehicle identification is crucial for accurate service, warranty claims, and ordering the correct parts for your 2015 Jeep Patriot. This manual doesn’t explicitly detail the location of the Vehicle Identification Number (VIN), but it’s typically found on the driver’s side dashboard, visible through the windshield.
The VIN is a unique 17-character code that identifies your specific vehicle. It’s also located on the vehicle’s registration and insurance documents. Knowing your VIN is essential when contacting Jeep customer assistance or a dealership for any service-related inquiries. Maintaining records related to your vehicle, including the VIN, will streamline any maintenance or repair processes throughout your ownership experience.
Important Safety Precautions

Your safety is paramount when operating the 2015 Jeep Patriot. This owner’s manual emphasizes the importance of understanding and adhering to all safety precautions outlined within its pages. Always read and comprehend the warnings and cautions related to vehicle operation, maintenance, and potential hazards.
Pay close attention to information regarding seatbelt usage, airbag systems, and child restraint systems. Never operate the vehicle under the influence of drugs or alcohol. Regular vehicle maintenance, as detailed in this manual, is also a critical safety measure. Prioritizing safety ensures a secure driving experience for you and your passengers, minimizing risks and maximizing vehicle reliability.

Understanding Your Vehicle
This section familiarizes owners with the 2015 Jeep Patriot’s components, from dashboard symbols to interior and exterior controls, ensuring confident operation.
Dashboard Symbols and Indicators
The 2015 Jeep Patriot’s instrument panel utilizes a comprehensive system of symbols and indicators to communicate vital vehicle information to the driver. Understanding these warnings and alerts is crucial for safe operation and preventative maintenance.
These indicators cover a wide range of systems, including engine performance, braking systems, safety features like airbags, and fluid levels. Illuminated symbols often require immediate attention, while others provide general status updates. Refer to the owner’s manual for a detailed explanation of each symbol’s meaning, including color-coded warnings (red, yellow, green) and recommended actions.
Ignoring a warning light could lead to more significant mechanical issues or compromise safety. Familiarize yourself with the location and function of each indicator to ensure a proactive approach to vehicle care and a secure driving experience.
Instrument Panel Overview

The 2015 Jeep Patriot’s instrument panel is designed for clear and concise delivery of essential vehicle data. Centrally located, the speedometer and tachometer provide immediate feedback on speed and engine RPM. Flanking these gauges are indicators for fuel level, engine temperature, and coolant temperature.
To the right, you’ll find warning lights and informational displays, communicating system status. The multi-function display, positioned within the instrument cluster, can be customized to show trip information, outside temperature, and more. Controls for adjusting brightness and display settings are conveniently located.
Familiarizing yourself with the layout and functionality of the instrument panel ensures quick access to critical information while driving, enhancing both safety and convenience.
Controls and Features ー Interior
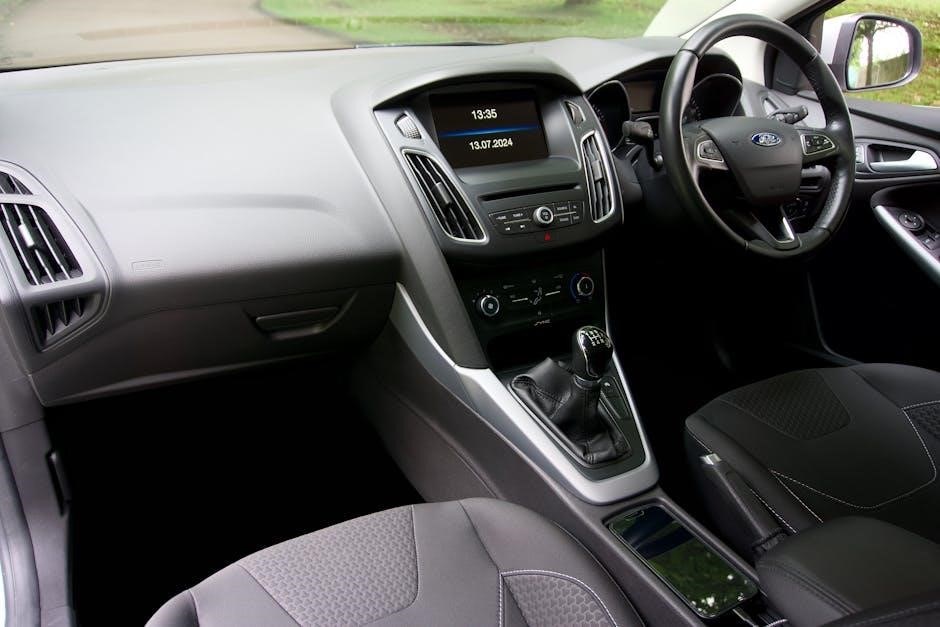
The 2015 Jeep Patriot’s interior offers a range of controls and features designed for comfort and convenience. The steering wheel incorporates audio controls and cruise control functionality, allowing for easy adjustments while driving. The center console houses the Uconnect infotainment system, providing access to audio, navigation, and climate control.
Manual climate controls allow for precise temperature adjustments, while power windows and door locks enhance convenience. Seating configurations vary, with options for cloth or leather upholstery. Ample storage compartments are strategically placed throughout the cabin, offering space for personal belongings.
Understanding the location and operation of these interior controls maximizes the driving experience and ensures a comfortable journey.
Controls and Features ‒ Exterior
The 2015 Jeep Patriot’s exterior features are designed for functionality and ease of use. Headlights, including automatic options, provide optimal visibility; Exterior mirrors are typically power-adjustable, enhancing driver awareness. Windshield wipers with various speed settings ensure clear visibility in inclement weather.
The tailgate offers easy access to the cargo area, and exterior lighting includes taillights, brake lights, and turn signals for safety. Keyless entry provides convenient access to the vehicle. The vehicle’s exterior also incorporates features like roof rails for additional cargo carrying capacity.
Familiarizing yourself with these exterior controls and features ensures safe and convenient operation of your 2015 Jeep Patriot.

Operating Your Vehicle
This section details starting, stopping, and driving the 2015 Jeep Patriot. It covers performance characteristics and proper fueling procedures for optimal operation.
Starting and Stopping the Engine
Before starting your 2015 Jeep Patriot, ensure the parking brake is engaged and the transmission is in Park or Neutral. Insert the key into the ignition and turn it to the ‘Start’ position, releasing once the engine ignites. Avoid prolonged cranking to prevent starter damage.
To stop the engine, simply turn the key to the ‘Off’ position. Remove the key to prevent accidental operation. Always allow the engine to idle briefly before shutting it off, especially after heavy use, to ensure proper cooling. Familiarize yourself with the specific starting and stopping procedures outlined in the owner’s manual for optimal performance and longevity of your vehicle’s engine.
Refer to the manual for detailed instructions regarding cold-weather starting and any specific considerations for your Patriot’s engine type.
Driving Modes and Performance
The 2015 Jeep Patriot offers versatile performance suited for various driving conditions. While not featuring selectable driving modes in the modern sense, its capabilities adapt to terrain. Understanding the vehicle’s limitations is crucial for safe operation.
For optimal performance, maintain appropriate tire pressure as specified in the owner’s manual. Be mindful of the Patriot’s ground clearance when navigating uneven surfaces. The manual details recommended driving practices for different weather conditions, including rain and snow. Proper vehicle maintenance, as outlined in the manual, significantly impacts performance.
Always prioritize safe driving habits and adhere to posted speed limits. Consult the owner’s manual for detailed information regarding the vehicle’s handling characteristics and performance capabilities.
Fueling and Fluid Checks
The 2015 Jeep Patriot’s owner’s manual emphasizes regular fluid checks for optimal performance. Locate and inspect engine oil, coolant, brake fluid, power steering fluid, and windshield washer fluid levels frequently. Refer to the manual for specific fluid specifications and capacities.
When fueling, use the recommended octane rating as detailed in the manual to prevent engine damage. Always ensure the fuel cap is securely tightened after refueling. Regularly check tire pressure, including the spare, and adjust as needed. The manual provides guidance on identifying the correct tire pressure for various driving conditions.
Promptly address any fluid leaks or low fluid levels to avoid potential mechanical issues. Consult a qualified technician if you are unsure about any fluid check or refueling procedure.

Maintenance and Care
The 2015 Jeep Patriot manual details scheduled maintenance, tire care, and fluid specifications. Following these guidelines ensures longevity and peak vehicle performance.
Scheduled Maintenance
Your 2015 Jeep Patriot’s longevity relies on adhering to the scheduled maintenance outlined in this owner’s manual. Regular inspections and servicing are crucial for optimal performance and safety. The manual provides a detailed schedule, covering oil changes, filter replacements (air, fuel, cabin), fluid level checks, and tire rotations.
Specific intervals are defined based on normal or severe driving conditions, so understanding your driving habits is key. Don’t neglect essential services like brake inspections, cooling system flushes, and transmission fluid changes. Proper maintenance not only prevents costly repairs but also maintains your vehicle’s resale value. Refer to the manual’s charts for precise mileage or time-based recommendations, ensuring your Patriot remains reliable for years to come.
Tire Information and Maintenance
Maintaining proper tire condition is paramount for your 2015 Jeep Patriot’s safety and handling. The owner’s manual details recommended tire sizes, pressures, and load ratings. Regularly check tire pressure – including the spare – and inflate to the specified PSI found on the tire placard. Inspect tires for wear, damage (cuts, bulges), and uneven tread patterns.
Rotate tires according to the schedule in the manual to promote even wear and extend their lifespan. Understand tire tread depth; worn tires compromise traction, especially in wet or snowy conditions. The manual also covers proper tire replacement procedures and speed ratings. Ignoring tire maintenance can lead to blowouts and reduced vehicle control, so prioritize these checks.
Fluid Specifications and Capacities
Your 2015 Jeep Patriot requires specific fluids to operate optimally. The owner’s manual lists the correct types and capacities for engine oil, coolant, transmission fluid, brake fluid, power steering fluid, and windshield washer fluid. Using the wrong fluids can cause damage to vehicle components. Refer to the manual for viscosity grades of engine oil suitable for different climates.
Capacities are provided for each fluid reservoir, aiding in accurate refills during maintenance. Regularly check fluid levels and top off as needed. The manual emphasizes the importance of using fluids meeting Chrysler’s specifications. Proper fluid maintenance ensures longevity and prevents costly repairs, contributing to reliable performance and vehicle safety.

In Case of Emergency
The 2015 Jeep Patriot owner’s manual details crucial emergency procedures, roadside assistance contacts, and proper towing information for owner safety.
Emergency Procedures
Your 2015 Jeep Patriot’s owner’s manual provides vital guidance for handling various emergency situations. It outlines steps to take in the event of a collision, including securing the vehicle and ensuring passenger safety. Detailed instructions are given for situations like a stalled engine, flat tire, or brake failure, emphasizing safe responses.
The manual also covers procedures for dealing with fire, including the location and proper use of fire extinguishers. Crucially, it advises on contacting emergency services and provides information for reporting accidents. Understanding these procedures is paramount for a swift and effective response, potentially minimizing injury and damage. Always prioritize personal safety and follow the outlined steps carefully during any emergency;
Roadside Assistance
The 2015 Jeep Patriot owner’s manual details available roadside assistance programs, offering peace of mind during unexpected breakdowns. It provides contact information for accessing support services, including towing, jump starts, and tire changes. These services are designed to quickly get you back on the road, minimizing inconvenience and potential delays.
The manual clarifies what is covered under the roadside assistance plan and any associated costs. It also outlines the information needed when requesting assistance, such as vehicle location and a description of the problem. Knowing these details beforehand streamlines the process and ensures a faster response. Utilizing these resources effectively can significantly reduce stress during a roadside emergency.
Towing Information
The 2015 Jeep Patriot owner’s manual provides crucial towing guidelines for safe vehicle transport. It details proper towing methods, including recommended equipment like tow straps and wheel dollies, to prevent damage during transit. Specific instructions are given regarding attachment points on the vehicle, ensuring a secure connection.
The manual outlines limitations on towing weight and distance, emphasizing the importance of adhering to these specifications. It also warns against improper towing practices that could compromise vehicle stability or cause mechanical failure. Understanding these guidelines is vital for both professional towing services and individuals attempting to tow the vehicle themselves. Following these instructions protects your Patriot from potential harm.
Technical Specifications
The 2015 Jeep Patriot manual details dimensions, weights, and engine/transmission specs. This section provides precise data for informed understanding of the vehicle’s capabilities.
Dimensions and Weights
The 2015 Jeep Patriot’s dimensions are crucial for navigating various terrains and understanding its spatial footprint. Detailed within the owner’s manual, these specifications cover overall length, width, and height, aiding in parking and maneuvering. Weight figures, including curb weight and gross vehicle weight rating (GVWR), are also provided.
These weights are essential for safe towing practices and load capacity calculations. The manual outlines specific weight limits to prevent overloading and maintain vehicle stability. Understanding these measurements allows owners to assess the Patriot’s suitability for their needs, whether it’s urban commuting or off-road adventures. Precise data ensures informed decisions regarding vehicle usage and maintenance.
Engine Specifications
The 2015 Jeep Patriot offered engine choices detailed within the owner’s manual, impacting performance and fuel efficiency. A 2.0L four-cylinder engine was standard, providing a balance of power and economy. Alternatively, a 2.4L four-cylinder engine offered increased horsepower and torque for more demanding driving conditions.
The manual specifies key engine parameters like displacement, horsepower, torque, and compression ratio. Understanding these specifications is vital for proper maintenance, including oil changes and tune-ups. Information on the engine’s firing order and recommended fuel type is also included. These details ensure optimal engine performance and longevity, allowing owners to maximize their driving experience;
Transmission Specifications
The 2015 Jeep Patriot owner’s manual outlines transmission details crucial for understanding vehicle operation and maintenance. A five-speed manual transmission was available, offering drivers direct control. More commonly, a continuously variable transmission (CVT) provided smooth, efficient gear changes. The manual details the specific gear ratios for both transmission types.
Understanding these specifications is essential for diagnosing potential issues and performing necessary servicing. Information regarding transmission fluid type and change intervals is clearly stated. Proper fluid maintenance ensures optimal transmission performance and prevents premature wear. The manual also covers basic troubleshooting tips and warnings related to transmission operation, enhancing driver awareness.

Warranty Information
The 2015 Jeep Patriot owner’s manual includes comprehensive warranty details, outlining coverage for repairs and defects. Contact Jeep customer assistance for specific claim procedures and assistance.
Warranty Coverage Details
The 2015 Jeep Patriot’s warranty provides coverage for defects in materials or workmanship under normal use. Basic coverage typically lasts for 3 years or 36,000 miles, whichever comes first, encompassing most vehicle components. Powertrain coverage, extending to 5 years or 60,000 miles, protects the engine, transmission, and drivetrain.

Corrosion protection is generally offered for 5 years, regardless of mileage. Specific exclusions apply, such as wear-and-tear items like brake pads and filters. To initiate a warranty claim, owners should contact an authorized Jeep dealership, providing documentation and a description of the issue. Review the full warranty booklet within the owner’s manual for precise terms and conditions.
Customer Assistance Information
For assistance with your 2015 Jeep Patriot, several resources are available. U.S. customers can call 1-877-426-5337 to request a complimentary printed Owner’s Manual, Navigation/Uconnect Manuals, or Warranty Booklet. Canadian customers should dial 1-800-387-1143 for the same services.
Additionally, contacting your local authorized Jeep dealership provides direct support for service, repairs, and warranty inquiries. The Jeep website offers a wealth of information, including FAQs, owner forums, and downloadable manuals. FCA US LLC, the manufacturer, provides customer care through their official channels. Promptly addressing concerns ensures a positive ownership experience.